
Getting started with JustChords: Difference between revisions
More actions
Created page with "= Getting Started with JustChords = Welcome to the JustChords wiki – we're really happy you're here! If you are reading this, you are not only interested in the app itself, but also in helping to build a shared knowledge base around it. This wiki is meant to be a collaborative space where users document tips, workflows, and best practices together. Please feel encouraged to: * Improve and extend this page. * Add screenshots, examples, and clarifications. * Create n..." |
No edit summary |
||
| (12 intermediate revisions by 2 users not shown) | |||
| Line 21: | Line 21: | ||
=== Option 1: Install from the App Store === | === Option 1: Install from the App Store === | ||
Open the App Store on your iPhone, iPad, Mac, or Apple Vision device. | |||
[[File:iphone-appstore-justchords.png|frameless]] | |||
[[File:ipad-appstore-justchords.png|frameless]] | |||
[[File:mac-appstore-justchords.png|frameless]] | |||
# In the search bar, type: '''JustChords'''. | # In the search bar, type: '''JustChords'''. | ||
# Look for the app named '''JustChords''' by ''Marek Palka'' | # Look for the app named '''JustChords''' by ''Marek Palka'' and click '''Download''' (or the download icon) to install the app. | ||
# Once installed, open JustChords from your home screen or Applications folder and follow the initial setup. | # Once installed, open JustChords from your home screen or Applications folder and follow the initial setup. | ||
| Line 46: | Line 49: | ||
If you later want to switch back to the stable App Store version, simply install the App Store version again. Your data remains available as long as it is stored locally and/or synced via iCloud. | If you later want to switch back to the stable App Store version, simply install the App Store version again. Your data remains available as long as it is stored locally and/or synced via iCloud. | ||
== | = JustChords Quick Start = | ||
When you first open JustChords the '''SONGS''' library and '''SETLISTS''' are empty. You determine the songs are available and which songs are added to a setlist. Note that the screen on the iPhone is slightly different. | |||
[[File:quickstart-mac-ipad-justchords.png|frameless]] | |||
== Song Import from Online Sources == | |||
[[Song Import | This Article can also be found here]] | |||
Adding the songs you like is easy. | |||
# Tap/Click '''Add song''' | |||
# Tap/Click '''Search online''' [[File:add-song-justchords.png|frameless]] | |||
Use the search Textbox to type the song title (and optionally artist). | |||
# Type '''Let It Be''' or any song title you like. (JustChords queries its known online chord resources and shows a list of matching songs.) | |||
# Tap/Click on the search result to see a preview of the chord sheet [[File:search-online-justchords.png|frameless]] | |||
Select the desired entry from the results and tap '''Import''' to add the song to your Library. | |||
# Tap/Click '''Import''' to store the chord sheet in your songs library | |||
# Tap/Click '''✓''' to close the dialog | |||
You have successfully imported the chord sheet. | |||
[[File:let-it-be-guitar-justchords.png]] | |||
== Chord Diagrams == | |||
Note that the top of the chord sheets shows guitar tabs. If you play another instrument like a piano you can change it in the display settings. JustChords supports Guitar, Piano and Ukulele Chord Diagrams. | |||
# Tap/Click the gear icon to open the settings. | |||
# Tap/Click '''Display''' | |||
[[File:song-view-settings-justchords.png|frameless]] | |||
# Select the instrument of choice | |||
# Tap/Click '''✓''' to close the dialog | |||
[[File:select-piano-justchords.png|frameless]] | |||
[[File:let-it-be-piano-justchords.png]] | |||
== Library == | |||
This page describes the main '''Library''' view in JustChords. The Library is the central place to manage your songs, setlists, and tools. When you open JustChords, the Library appears as a blue sidebar on the left with three main sections: '''SONGS''', '''SETLISTS''', and '''TOOLS'''. The main content area on the right shows the selected item or, when nothing is selected, a “No song selected” message with a musical note graphic. | |||
[[File:quickstart-mac-ipad-justchords.png|frameless|Library view with SONGS, SETLISTS, and TOOLS sidebar.]] | |||
At the top of the Library sidebar you will see the title “Library” and three icons: the '''folder icon''', the '''menu icon''' (three horizontal lines; opens the Main menu), and the '''hide/show icon''' (hides or shows the blue Library sidebar). The choices under each section are listed below. | |||
== Folder icon (top of sidebar) == | |||
[[File:folder-justchords.png|Folder icon menu: Add Folder, Refresh, Backup / Restore.]] | |||
Tapping or clicking the '''folder icon''' at the top of the Library sidebar opens a menu with these options: | |||
* '''Add Folder''' – Opens the Folder dialog so you can create a new folder. | |||
[[File:add-folder-justchords.png|frameless|New folder dialog: Title, Type (Folder / Shared Folder).]] | |||
Enter a '''Title''' (e.g. band name or project) and choose the '''Type''': '''Folder''' (standard) or '''Shared Folder''' (for sharing with bandmates). Use folders to organize songs and setlists by band or project; shared folders make it easy to collaborate. Tap or click '''Save''' to create the folder. | |||
* '''Current Folder''' – A section label indicating that the options below apply to the folder you are currently viewing (if any). | |||
== Backup / Restore == | |||
* '''Refresh''' – Reloads the contents of the current folder or folder list so you see the latest songs and setlists. | |||
* '''Backup / Restore''' – Opens the Backup / Restore dialog. | |||
[[File:backup-restore-justchords.png|frameless|Backup / Restore: restore from automatic backup or file; automatic backup frequency, Backup now, Backup to file.]] | |||
** '''RESTORE''': '''Restore from automatic backup''' – Restore from a backup the app created automatically. '''Restore from file''' – Restore from a backup file you saved manually. | |||
** '''BACKUP''': '''Automatic backup''' – Set how often the app backs up your data ('''Disabled''', '''Daily''', '''Weekly''', or '''Monthly'''). '''Backup now''' – Create a backup immediately. '''Backup to file''' – Save a backup to a file of your choice (e.g. for moving to another device or keeping an extra copy). | |||
== Menu icon (Main menu) == | |||
[[File:main-menu-justchords.png|frameless|Main menu: APP (Information, Storage), GENERAL (Appearance, Settings, MIDI).]] | |||
Tap or click the '''menu icon''' (three horizontal lines) at the top of the Library sidebar to open the '''Main menu'''. The menu appears as a blue overlay with the title “Main menu” at the top; tap or click the checkmark (✓) in the top-right corner to close it. | |||
The Main menu is divided into sections. You may need to '''scroll down''' to see all of them. | |||
'''APP''' | |||
* '''Information''' – Opens app information (version, credits, etc.). | |||
* '''Storage''' – Opens storage settings for your JustChords data. | |||
* '''Keep Downloaded''' – An informational tip: to keep your JustChords files on your device (e.g. for offline use), open the '''Files''' app, find the '''JustChords''' folder in '''iCloud Drive''', long-press it, and select '''Keep Downloaded'''. This keeps your data always available offline. You can dismiss this message with the small ×. | |||
'''GENERAL''' | |||
* '''Appearance''' – Opens appearance options (theme, layout, etc.). | |||
* '''Settings''' – Opens app settings (the gear icon). | |||
* '''MIDI''' – Opens MIDI settings. The current status (e.g. “Off”) is shown next to it. See [[MIDI]] for more. | |||
'''SUPPORT''' (scroll down to see) | |||
[[File:support-justchords.png|frameless|Main menu SUPPORT section: Support JustChords, Discord, Write Us.]] | |||
* '''Support JustChords''' – Option to support the app (e.g. donation or tip). | |||
* '''Discord''' – Opens or links to the JustChords Discord community. | |||
* '''Write Us''' – Opens a way to contact the JustChords team (e.g. email or feedback form). | |||
== Hide/show icon (top of sidebar) == | |||
Tap or click the '''hide/show icon''' at the top of the Library sidebar to hide or show the blue Library menu. When hidden, the sidebar collapses so the main content area (songs, setlists, or tools) uses more space. Tap or click the icon again to show the Library sidebar. | |||
== SONGS == | |||
The '''SONGS''' section is your personal chord and lyrics library. It offers these choices: | |||
* '''All songs''' – Shows every song in your library. A count (e.g. 0) appears next to this option indicating how many songs you have. Select this to browse or search all your chord sheets and lyrics. | |||
* '''Tags''' – Opens the Tags screen. | |||
[[File:tags-justchords.png|frameless|Tags screen: Create tags, Untagged list.]] | |||
so you can browse and filter songs by tags (e.g. “worship”, “acoustic”, “key of G”). At the top you’ll see a back arrow, the title “Tags”, '''Edit''' (to modify tags), and a list/layout icon. If you have no tags yet, the screen shows “You have no tags.”, “Organize your songs using tags.”, and '''Create tags''' to add your first tag. At the bottom, '''Untagged''' shows how many songs have no tag (e.g. “1”); tap or click it to see the list of untagged songs. | |||
* '''Artists''' – Opens the Artists screen. | |||
[[File:artists-justchords.png|frameless|Artists screen: search, artist list with song count.]] | |||
so you can browse songs grouped by artist. At the top you’ll see a back arrow, the title “Artists”, '''Select''' (to choose multiple artists), and a layout/view toggle icon (e.g. list vs grid). A search or filter field lets you type to find artists by name. Each artist appears in the list with a count (e.g. “1”) showing how many songs are associated with that artist; tap or click an artist (or the right arrow “>”) to open that artist’s songs. | |||
* '''Recents''' – Shows recently viewed or added songs so you can quickly return to what you were working on. | |||
* '''Add song''' – Opens a menu with options. | |||
[[File:add-song-justchords.png|frameless|Add song menu: Search online, Write song, Paste from clipboard, Import from file.]] | |||
to add a new song: '''Search online''' (find chord sheets on the web; see [[Getting started with JustChords#Quick Start|Quick Start]]), '''Write song''' (create a song from scratch), '''Paste from clipboard''' (paste lyrics or chord text you copied), and '''Import from file''' (import from a file on your device). Choose the option that fits how you want to add the song. | |||
== SETLISTS == | |||
The '''SETLISTS''' section is where you build and manage setlists for gigs, rehearsals, or worship services. It offers these choices: | |||
* '''All setlists''' – Lists all your setlists. A count (e.g. 0) appears next to this option. Select a setlist to view or edit its songs and order. | |||
* '''New setlist''' – | |||
[[File:new-setlist-justchords.png|frameless|New setlist dialog: name, Setlist specific edits, ITEMS.]] | |||
[[File:add-setlist-art.png|frameless|Setlist artwork: Choose Photo, Choose File, Paste from clipboard.]] | |||
Opens the “New setlist” dialog. At the top: '''X''' to cancel, the title “New setlist”, and '''✓''' to save. You can add artwork for the setlist by tapping the musical-note placeholder (camera icon); a menu appears with '''Choose Photo''' (from your photo library), '''Choose File''' (from your device), or '''Paste from clipboard''' (paste an image you copied). Enter a '''name''' for the setlist (e.g. “Practice”, “Saturday gig”). Under “Setlist specific edits”, a toggle lets you choose whether transpose, capo, structure, and notes apply only to this setlist. In the '''ITEMS''' section, tap '''Add ...''' to add items; you can add '''Songs''' (from your library) or '''Divider / Event''' (to separate or label parts of the setlist). Tap '''✓''' when done. You can reorder items by dragging. | |||
== TOOLS == | |||
The '''TOOLS''' section gives you utilities for practice and performance. It offers these choices: | |||
* '''New Window''' – Opens a new JustChords window. Useful for viewing a song or setlist on a second screen (e.g. for projection or a separate music stand). | |||
* '''Tuner''' – Opens the built-in tuner. | |||
[[File:tuner-justchords.png|frameless|Tuner: detected note, frequency, tuning scale.]] | |||
for tuning your instrument. At the top you’ll see the title “Tuner” and a checkmark (✓) to close. The tuner shows the detected note (e.g. a large green “A”), the octave (e.g. “4” for A4), and the frequency (e.g. “440,0 Hz”). A horizontal tuning scale below indicates how close your pitch is to the target: a bright green vertical line in the center means you’re in tune; the line moves left or right when you’re flat or sharp. See [[Metronome & Tuner]] for more. | |||
* '''Metronome''' – Opens the built-in metronome. | |||
[[File:metronome-justchords.png|frameless|Metronome: time signature, BPM, TAP, Play.]] | |||
[[File:metronome-settings-justchords.png|frameless|Metronome settings: CONTROL (Count in, Stop metronome), ACTIONS (Sound, Blink).]] | |||
for practice and performance. At the top you’ll see the title “Metronome”, a '''Settings''' (gear) icon, and a checkmark (✓) to close. Choose a '''time signature''' from the dropdown (e.g. 4/4, 3/4, 6/8). The large '''BPM''' display (e.g. 120) shows the current tempo; use the slider or the '''−''' and '''+''' buttons to adjust it. Tap '''TAP''' to set the BPM by tapping in time (tap tempo), or tap the '''Play''' (▶) button to start or stop the metronome. Tap the '''Settings''' (gear) icon to open metronome settings: under '''CONTROL''', set '''Count in''' (e.g. 1 measure) and '''Stop metronome''' (e.g. Never; applies when the metronome is on for the selected song); under '''ACTIONS''', set '''Sound''' (e.g. Drum sticks) and '''Blink''' (e.g. Border, for a visual beat indicator). Tap the checkmark to save. See [[Metronome & Tuner]] for more. | |||
* '''Chord Library''' – Opens the chord library. | |||
[[File:guitar-chord-libary.png|frameless|Chord Library – Guitar.]] | |||
[[File:ukulele-chord-library.png|frameless|Chord Library – Ukulele.]] | |||
[[File:piano-chord-library.png|frameless|Chord Library – Piano.]] | |||
: a reference of chord shapes and voicings. At the top you’ll see an '''instrument selector''' (pill buttons for '''Guitar''', '''Ukulele''', '''Piano'''), the title “Chord Library”, and '''+''' (add a custom chord) and '''✓''' (done). Use the tabs '''All chords''' and '''My chords''' (your saved chords). The '''Chord''' selector lets you pick the root note (e.g. C), chord quality (e.g. major, minor, diminished), and slash/inversion. The main area shows a grid of chord diagrams: for guitar and ukulele, fretboard diagrams with finger numbers, open (o) and muted (x) strings, and starting-fret labels; for piano, mini keyboard diagrams with the chord notes highlighted. Each chord can have multiple voicings. Use it to look up fingerings and to audition chords. See [[Chord Library]] for more. | |||
* '''Recordings''' – Opens your recordings. Use this to manage or play back audio recordings (e.g. backing tracks, practice takes, or reference recordings) alongside your chord sheets. | |||
== Summary == | |||
{| class="wikitable" | |||
|- | |||
! Section !! Choices | |||
|- | |||
| '''SONGS''' || All songs, Tags, Artists, Recents, Add song | |||
|- | |||
| '''SETLISTS''' || All setlists, New setlist | |||
|- | |||
| '''TOOLS''' || New Window, Tuner, Metronome, Chord Library, Recordings | |||
|} | |||
For first-time setup and importing your first song, see [[Getting started with JustChords]]. For more on setlists, editing, and display options, use the links above or the navigation on the wiki. | |||
---- | |||
'''Note:''' To display the screen captures on the wiki, upload the PNG files (e.g. ''quickstart-mac-ipad-justchords.png'', ''folder-justchords.png'', ''add-folder-justchords.png'', ''backup-restore-justchords.png'', ''main-menu-justchords.png'', ''support-justchords.png'', ''tags-justchords.png'', ''artists-justchords.png'', ''add-song-justchords.png'', ''new-setlist-justchords.png'', ''add-setlist-art.png'', ''tuner-justchords.png'', ''metronome-justchords.png'', ''metronome-settings-justchords.png'', ''guitar-chord-libary.png'', ''ukulele-chord-library.png'', ''piano-chord-library.png'') to the wiki so that the '''[[File:...]]''' references resolve correctly. | |||
== Next Steps == | |||
This Wiki is updated frequently to include all the features and user experience of JustChord. Check this Wiki to stay up to date. | |||
Latest revision as of 21:03, 31 January 2026
Getting Started with JustChords
Welcome to the JustChords wiki – we're really happy you're here! If you are reading this, you are not only interested in the app itself, but also in helping to build a shared knowledge base around it. This wiki is meant to be a collaborative space where users document tips, workflows, and best practices together.
Please feel encouraged to:
- Improve and extend this page.
- Add screenshots, examples, and clarifications.
- Create new pages for topics that are missing.
Together we can turn this wiki into a practical handbook for everyone using JustChords.
Installing JustChords
There are two main ways to install JustChords on your devices:
- via the official App Store
- via TestFlight (beta version)
You can choose whichever fits your needs best. The beta usually contains newer features, while the App Store version is the stable release.
Option 1: Install from the App Store
Open the App Store on your iPhone, iPad, Mac, or Apple Vision device.


- In the search bar, type: JustChords.
- Look for the app named JustChords by Marek Palka and click Download (or the download icon) to install the app.
- Once installed, open JustChords from your home screen or Applications folder and follow the initial setup.
You can also find a direct App Store link on the main website:
- Go to https://www.justchords.app in your browser.
- Follow the App Store link or button provided there.
- Install the app as described above.
Option 2: Join the TestFlight beta
If you want early access to new features and are happy to use a beta version, you can join the TestFlight program.
- Make sure the Apple TestFlight app is installed on your device (from the App Store).
- Open this link on your device:
https://testflight.apple.com/join/90RDHjjR
- TestFlight will show an invitation to join the JustChords beta.
- Tap Accept (or Install) to add the beta version of JustChords.
- Once installed, open JustChords as usual. Your data is kept on your device and in iCloud, so joining the beta does not erase your existing songs or setlists.
If you later want to switch back to the stable App Store version, simply install the App Store version again. Your data remains available as long as it is stored locally and/or synced via iCloud.
JustChords Quick Start
When you first open JustChords the SONGS library and SETLISTS are empty. You determine the songs are available and which songs are added to a setlist. Note that the screen on the iPhone is slightly different.

Song Import from Online Sources
This Article can also be found here
Adding the songs you like is easy.
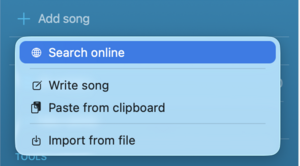
- Tap/Click Add song
- Tap/Click Search online
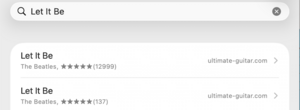
Use the search Textbox to type the song title (and optionally artist).
- Type Let It Be or any song title you like. (JustChords queries its known online chord resources and shows a list of matching songs.)
- Tap/Click on the search result to see a preview of the chord sheet

Select the desired entry from the results and tap Import to add the song to your Library.
- Tap/Click Import to store the chord sheet in your songs library
- Tap/Click ✓ to close the dialog
You have successfully imported the chord sheet.

Chord Diagrams
Note that the top of the chord sheets shows guitar tabs. If you play another instrument like a piano you can change it in the display settings. JustChords supports Guitar, Piano and Ukulele Chord Diagrams.
- Tap/Click the gear icon to open the settings.
- Tap/Click Display

- Select the instrument of choice
- Tap/Click ✓ to close the dialog


Library
This page describes the main Library view in JustChords. The Library is the central place to manage your songs, setlists, and tools. When you open JustChords, the Library appears as a blue sidebar on the left with three main sections: SONGS, SETLISTS, and TOOLS. The main content area on the right shows the selected item or, when nothing is selected, a “No song selected” message with a musical note graphic.
At the top of the Library sidebar you will see the title “Library” and three icons: the folder icon, the menu icon (three horizontal lines; opens the Main menu), and the hide/show icon (hides or shows the blue Library sidebar). The choices under each section are listed below.
Folder icon (top of sidebar)

Tapping or clicking the folder icon at the top of the Library sidebar opens a menu with these options:
- Add Folder – Opens the Folder dialog so you can create a new folder.

Enter a Title (e.g. band name or project) and choose the Type: Folder (standard) or Shared Folder (for sharing with bandmates). Use folders to organize songs and setlists by band or project; shared folders make it easy to collaborate. Tap or click Save to create the folder.
- Current Folder – A section label indicating that the options below apply to the folder you are currently viewing (if any).
Backup / Restore
- Refresh – Reloads the contents of the current folder or folder list so you see the latest songs and setlists.
- Backup / Restore – Opens the Backup / Restore dialog.

- RESTORE: Restore from automatic backup – Restore from a backup the app created automatically. Restore from file – Restore from a backup file you saved manually.
- BACKUP: Automatic backup – Set how often the app backs up your data (Disabled, Daily, Weekly, or Monthly). Backup now – Create a backup immediately. Backup to file – Save a backup to a file of your choice (e.g. for moving to another device or keeping an extra copy).
Menu icon (Main menu)

Tap or click the menu icon (three horizontal lines) at the top of the Library sidebar to open the Main menu. The menu appears as a blue overlay with the title “Main menu” at the top; tap or click the checkmark (✓) in the top-right corner to close it.
The Main menu is divided into sections. You may need to scroll down to see all of them.
APP
- Information – Opens app information (version, credits, etc.).
- Storage – Opens storage settings for your JustChords data.
- Keep Downloaded – An informational tip: to keep your JustChords files on your device (e.g. for offline use), open the Files app, find the JustChords folder in iCloud Drive, long-press it, and select Keep Downloaded. This keeps your data always available offline. You can dismiss this message with the small ×.
GENERAL
- Appearance – Opens appearance options (theme, layout, etc.).
- Settings – Opens app settings (the gear icon).
- MIDI – Opens MIDI settings. The current status (e.g. “Off”) is shown next to it. See MIDI for more.
SUPPORT (scroll down to see)

- Support JustChords – Option to support the app (e.g. donation or tip).
- Discord – Opens or links to the JustChords Discord community.
- Write Us – Opens a way to contact the JustChords team (e.g. email or feedback form).
Hide/show icon (top of sidebar)
Tap or click the hide/show icon at the top of the Library sidebar to hide or show the blue Library menu. When hidden, the sidebar collapses so the main content area (songs, setlists, or tools) uses more space. Tap or click the icon again to show the Library sidebar.
SONGS
The SONGS section is your personal chord and lyrics library. It offers these choices:
- All songs – Shows every song in your library. A count (e.g. 0) appears next to this option indicating how many songs you have. Select this to browse or search all your chord sheets and lyrics.
- Tags – Opens the Tags screen.

so you can browse and filter songs by tags (e.g. “worship”, “acoustic”, “key of G”). At the top you’ll see a back arrow, the title “Tags”, Edit (to modify tags), and a list/layout icon. If you have no tags yet, the screen shows “You have no tags.”, “Organize your songs using tags.”, and Create tags to add your first tag. At the bottom, Untagged shows how many songs have no tag (e.g. “1”); tap or click it to see the list of untagged songs.
- Artists – Opens the Artists screen.

so you can browse songs grouped by artist. At the top you’ll see a back arrow, the title “Artists”, Select (to choose multiple artists), and a layout/view toggle icon (e.g. list vs grid). A search or filter field lets you type to find artists by name. Each artist appears in the list with a count (e.g. “1”) showing how many songs are associated with that artist; tap or click an artist (or the right arrow “>”) to open that artist’s songs.
- Recents – Shows recently viewed or added songs so you can quickly return to what you were working on.
- Add song – Opens a menu with options.

to add a new song: Search online (find chord sheets on the web; see Quick Start), Write song (create a song from scratch), Paste from clipboard (paste lyrics or chord text you copied), and Import from file (import from a file on your device). Choose the option that fits how you want to add the song.
SETLISTS
The SETLISTS section is where you build and manage setlists for gigs, rehearsals, or worship services. It offers these choices:
- All setlists – Lists all your setlists. A count (e.g. 0) appears next to this option. Select a setlist to view or edit its songs and order.
- New setlist –


Opens the “New setlist” dialog. At the top: X to cancel, the title “New setlist”, and ✓ to save. You can add artwork for the setlist by tapping the musical-note placeholder (camera icon); a menu appears with Choose Photo (from your photo library), Choose File (from your device), or Paste from clipboard (paste an image you copied). Enter a name for the setlist (e.g. “Practice”, “Saturday gig”). Under “Setlist specific edits”, a toggle lets you choose whether transpose, capo, structure, and notes apply only to this setlist. In the ITEMS section, tap Add ... to add items; you can add Songs (from your library) or Divider / Event (to separate or label parts of the setlist). Tap ✓ when done. You can reorder items by dragging.
TOOLS
The TOOLS section gives you utilities for practice and performance. It offers these choices:
- New Window – Opens a new JustChords window. Useful for viewing a song or setlist on a second screen (e.g. for projection or a separate music stand).
- Tuner – Opens the built-in tuner.

for tuning your instrument. At the top you’ll see the title “Tuner” and a checkmark (✓) to close. The tuner shows the detected note (e.g. a large green “A”), the octave (e.g. “4” for A4), and the frequency (e.g. “440,0 Hz”). A horizontal tuning scale below indicates how close your pitch is to the target: a bright green vertical line in the center means you’re in tune; the line moves left or right when you’re flat or sharp. See Metronome & Tuner for more.
- Metronome – Opens the built-in metronome.


for practice and performance. At the top you’ll see the title “Metronome”, a Settings (gear) icon, and a checkmark (✓) to close. Choose a time signature from the dropdown (e.g. 4/4, 3/4, 6/8). The large BPM display (e.g. 120) shows the current tempo; use the slider or the − and + buttons to adjust it. Tap TAP to set the BPM by tapping in time (tap tempo), or tap the Play (▶) button to start or stop the metronome. Tap the Settings (gear) icon to open metronome settings: under CONTROL, set Count in (e.g. 1 measure) and Stop metronome (e.g. Never; applies when the metronome is on for the selected song); under ACTIONS, set Sound (e.g. Drum sticks) and Blink (e.g. Border, for a visual beat indicator). Tap the checkmark to save. See Metronome & Tuner for more.
- Chord Library – Opens the chord library.


- a reference of chord shapes and voicings. At the top you’ll see an instrument selector (pill buttons for Guitar, Ukulele, Piano), the title “Chord Library”, and + (add a custom chord) and ✓ (done). Use the tabs All chords and My chords (your saved chords). The Chord selector lets you pick the root note (e.g. C), chord quality (e.g. major, minor, diminished), and slash/inversion. The main area shows a grid of chord diagrams: for guitar and ukulele, fretboard diagrams with finger numbers, open (o) and muted (x) strings, and starting-fret labels; for piano, mini keyboard diagrams with the chord notes highlighted. Each chord can have multiple voicings. Use it to look up fingerings and to audition chords. See Chord Library for more.
- Recordings – Opens your recordings. Use this to manage or play back audio recordings (e.g. backing tracks, practice takes, or reference recordings) alongside your chord sheets.
Summary
| Section | Choices |
|---|---|
| SONGS | All songs, Tags, Artists, Recents, Add song |
| SETLISTS | All setlists, New setlist |
| TOOLS | New Window, Tuner, Metronome, Chord Library, Recordings |
For first-time setup and importing your first song, see Getting started with JustChords. For more on setlists, editing, and display options, use the links above or the navigation on the wiki.
Note: To display the screen captures on the wiki, upload the PNG files (e.g. quickstart-mac-ipad-justchords.png, folder-justchords.png, add-folder-justchords.png, backup-restore-justchords.png, main-menu-justchords.png, support-justchords.png, tags-justchords.png, artists-justchords.png, add-song-justchords.png, new-setlist-justchords.png, add-setlist-art.png, tuner-justchords.png, metronome-justchords.png, metronome-settings-justchords.png, guitar-chord-libary.png, ukulele-chord-library.png, piano-chord-library.png) to the wiki so that the File:... references resolve correctly.
Next Steps
This Wiki is updated frequently to include all the features and user experience of JustChord. Check this Wiki to stay up to date.